
Docs Search the docs
  1. Docs
  2. Get started

The Fluah window

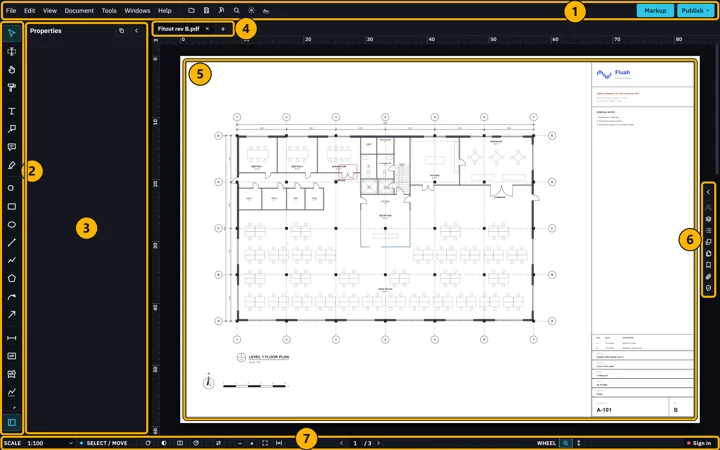
Seven parts, and what each one holds.
  • Tutorial
  • 1 min
  • Free and Pro
  • Checked with Fluah 1.0.34
The Fluah window: 1 top bar, 2 toolbar, 3 Properties panel, 4 tabs, 5 page, 6 pull-up bar, 7 status bar

Steps

  1. Top bar: the menus, then Open Save Flatten & save Search Settings Sign.

    The top bar: File, Edit, View, Document, Tools, Windows, Help, then Open, Save, Flatten & save, Search, Settings and Sign

    At its right end: the mode, and Publish.

    Markup, the mode, and Publish at the top bar's right end
  2. Toolbar: the tools. Point at one for its name and key.

    The toolbar: select and pan, text, highlight and shape tools
  3. Properties panel: how the tool or markup you picked looks.
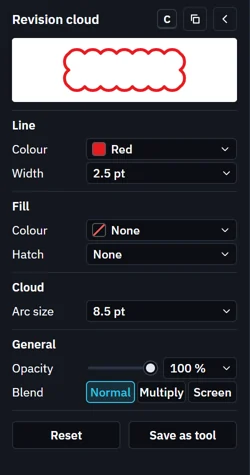
    The Properties panel with Revision cloud picked: line, fill, cloud and general settings
  4. Tabs: one per open PDF. + opens another.

    The tab of Fitout rev B.pdf and the plus that opens another PDF
  5. Page: the drawing, with rulers in its scale.

  6. Pull-up bar: opens the drawer at a view.

    The pull-up bar down the page's right edge: the drawer arrow, Collaborate, Toolbox, Markups, Layers, Pages, Bookmarks, Attachments and Check
  7. Status bar: scale, tool, view switches and zoom.

    The status bar's left part: scale, tool, Reuse tool, Dark mode, Split view, Auto save, Sync views, zoom buttons

    The page number sits in its middle.

    The page number in the middle of the status bar, then WHEEL
    Tip. Right-click any bar to hide or show its buttons. See Hide or show a button.
Was this page helpful?

Updated 6 November 2026

